Now is the time of year when we’re in full swing preparing for the holiday season. That means producing large batches of products, bulking up inventory, and creating a wide variety of items to appeal to different customers. It’s a busy season that requires planning, organization, and a clear strategy.
Whether you’re making dozens—or hundreds—of items, it’s important to find balance: create lower-priced pieces that make for memorable handmade gifts, while also offering a few higher-end works for those looking for something extra special.
Step 1: Planning
Start by looking at your calendar. You already know when your markets are scheduled—so work backward. Estimate how long each stage will take and map out your timeline. I like to think of it in four main stages: Planning, Material Acquisition, Production, and Finishing.
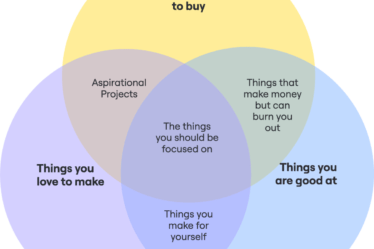
In this first stage, give yourself time to think strategically:
- What’s trending this year? Visit markets, browse online, and talk to fellow artists.
- Review your past sales. What were your best-sellers last season? What did customers ask for that you didn’t have?
- Pay attention to local trends. What’s resonating in your area right now?
For example, last year for us, gnomes and hippos were huge hits—but every year is different! Trust your gut and use your experience to guide what you create.
Step 2: Material Acquisition
Once you’ve finalized your product plan, gather your materials early to avoid bottlenecks. Ask yourself:
- Where will you source your materials?
- How long does your supplier usually take to fulfill orders—days, weeks?
- Do you have a backup supplier in case something is out of stock?
Always order sooner rather than later to build in a safety buffer. If space and budget allow, keep a small stockpile of essential materials. Be mindful of expiration dates on consumables like glue, paint, or finishes, and restock before you run out.
Step 3: Production
This stage includes everything from prepping your materials to burning, coloring, and sealing your pieces. Create a realistic timetable for each step—and then add a little extra cushion for those inevitable distractions or delays.
Batch work is your best friend. Group similar tasks:
- Do all your sanding at once.
- Then move on to burning, coloring, and sealing in order.
- Before each stage, make sure you have all the supplies ready.
Set internal deadlines for each batch. If you start to fall behind, reassess early—otherwise, your entire production schedule can snowball.
Step 4: Finishing and Packaging
After your pieces are sealed and assembled, make sure your finishing materials are ready to go—tags, earring backings, boxes, tissue paper, business cards, and anything else for presentation. Don’t assume last year’s leftovers will be enough; count everything and restock before you start packaging.
This should be a smooth stage, not a scramble.
Example Timeline
Let’s say your market is on November 28. Here’s how you might plan it out:
| Stage | Dates |
| Planning | Oct 25 – Oct 27 |
| Material Acquisition | Oct 28 – Nov 3 |
| Production | Nov 4 – Nov 24 |
| Finishing | Nov 25 – Nov 27 |
By mapping it out this way, you’ll always know where you stand and can adjust as needed.
Don’t Forget the Extras
- Restocking: If you’re doing multiple markets, plan for how you’ll replenish inventory between events.
- Overhead & Marketing: Factor in time for bookkeeping, photography, social media posts, and packaging updates. These tasks take longer than we often think.
Final Thoughts
I hope this helps you plan your own holiday production schedule. What are some of your best product-planning tips? Share them with us over on Instagram @bz_furfur — and as always, stay unique.